 Save to Pinterest
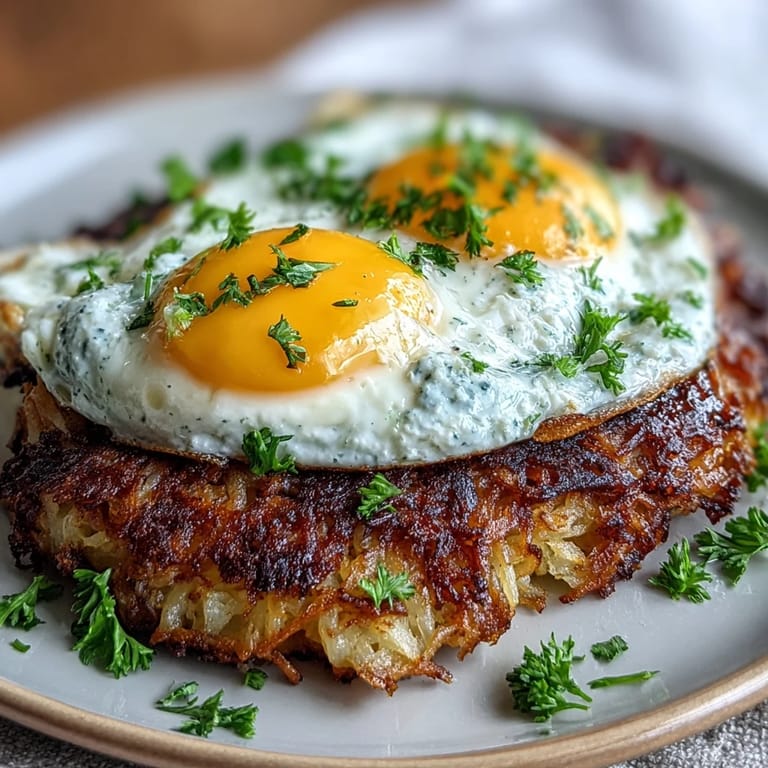
 A visiting friend once called celeriac ugly, and I couldn't argue—knobbly, dirt-caked, and utterly unphotogenic in the produce aisle. But after grating it into shreds and frying it golden in olive oil, that same friend scraped her plate clean and asked for the recipe. That's the magic of celeriac rösti: it transforms an underdog root into crispy, earthy rounds that crackle under your fork and taste like the best parts of autumn condensed into a single bite. The harissa yogurt adds a tangy kick that wakes everything up, and the fried egg on top? Pure luxury, no matter the hour.
I first made these on a Sunday morning when the farmers market had sold out of sweet potatoes, leaving me with a lone celeriac I'd never cooked before. My kitchen smelled like onions and parsley as I squeezed handfuls of grated vegetables over the sink, wondering if I was wasting my time. But the moment those first rösti hit the hot oil and started to sizzle, I knew I'd stumbled onto something good. My partner wandered in, drawn by the smell, and we ended up eating them straight from the pan, standing at the counter, dolloping on yogurt between bites.
Ingredients
- Celeriac: This knobby root brings a subtle celery flavor and earthy sweetness that deepens as it crisps—peel it thickly to remove all the rough skin, and don't worry if it browns a bit after grating.
- Potatoes: They add starch that helps bind the rösti together and create those irresistibly crispy edges, so choose a starchy variety like Russets if you can.
- Onion: Finely grated onion melts into the mixture and adds a gentle sweetness that balances the earthiness of the celeriac without overpowering it.
- Fresh parsley: Chopped parsley brings a bright, grassy note that cuts through the richness and makes each bite feel lighter and more vibrant.
- Plain flour: Just a couple of tablespoons hold everything together without making the rösti heavy—you can swap in gluten-free flour and never notice the difference.
- Egg: One large egg binds the shredded vegetables into cohesive patties that hold their shape beautifully in the pan.
- Olive oil: Use enough to generously coat the pan so the rösti fry evenly and develop that golden, crackling crust.
- Greek yogurt: Thick, tangy yogurt serves as the perfect creamy base for the harissa, cooling down the heat while adding richness.
- Harissa paste: This North African chili paste delivers smoky, spicy depth—start with less if you're heat-sensitive, then adjust to your taste.
- Lemon juice: A squeeze of lemon brightens the yogurt and balances the richness of the egg and oil with a little acidity.
- Eggs for frying: Four fresh eggs with runny yolks turn this from a simple side into a complete, satisfying meal.
- Butter or olive oil for frying eggs: Butter gives a richer flavor, while olive oil keeps things lighter—either way, use enough to prevent sticking.
Tired of Takeout? 🥡
Get 10 meals you can make faster than delivery arrives. Seriously.
One email. No spam. Unsubscribe anytime.
Instructions
- Squeeze out the moisture:
- Place your grated celeriac and potato in a clean kitchen towel, twist it tight, and wring out as much liquid as you can—this step is crucial for crispy rösti, so don't rush it. You'll be surprised how much water comes out, and that's exactly what you want.
- Mix the rösti base:
- In a large bowl, combine the squeezed vegetables with grated onion, parsley, flour, egg, salt, and pepper, stirring until everything is evenly distributed. The mixture should hold together when you press it, but still look shaggy and loose.
- Fry the first batch:
- Heat half the olive oil in a non-stick pan over medium heat, then spoon heaped tablespoons of the mixture into the pan and flatten them gently with the back of your spoon. Let them sizzle undisturbed for four to five minutes until the bottoms are deeply golden and crisp.
- Flip and finish:
- Carefully flip each rösti and cook the other side until equally golden, adding more oil if the pan looks dry. Transfer the finished rösti to a paper towel-lined plate and keep them warm while you fry the rest.
- Make the harissa yogurt:
- In a small bowl, stir together Greek yogurt, harissa paste, lemon juice, and a pinch of salt, tasting and adjusting until the heat and tang feel balanced. This sauce should be bold but not punishing, creamy but bright.
- Fry the eggs:
- Heat butter or oil in a clean pan over medium heat, crack in the eggs, and fry them to your liking—I prefer runny yolks that spill into the yogurt. Season with salt and pepper while they're still hot.
- Plate and serve:
- Arrange the warm rösti on plates, spoon a generous dollop of harissa yogurt on top, then crown each with a fried egg. Scatter extra parsley over everything and serve with lemon wedges on the side for squeezing.
 Save to Pinterest
 One winter evening, I served these to a table of friends who'd never heard of celeriac, and they devoured every last one, mopping up yogurt with torn bread and arguing over who got the last egg. That night, this dish stopped being just a recipe I'd tried and became something I was proud to share, a little proof that the best meals don't need exotic ingredients or complicated techniques. Sometimes all you need is a gnarly root vegetable, a hot pan, and the willingness to trust the process.
Getting the Crispiest Rösti
The secret to restaurant-level crispiness is threefold: squeeze out every drop of moisture you can, don't overcrowd the pan, and resist the urge to fiddle with them while they cook. I used to flip mine too early, worried they were burning, but patience rewards you with that shattering, golden crust that makes the dish worth making. If your pan isn't non-stick, add a little extra oil and let it get properly hot before adding the mixture, so the rösti release cleanly when it's time to flip.
Making It Ahead
You can grate the vegetables and mix everything together up to a day in advance, storing the mixture in the fridge in an airtight container with a layer of plastic wrap pressed directly onto the surface to prevent browning. The harissa yogurt also keeps beautifully for several days and actually tastes better after the flavors have had time to meld. Just fry the rösti and eggs fresh when you're ready to eat, and you'll have a stunning meal on the table in under fifteen minutes.
Variations and Swaps
If celeriac isn't available, try swapping in parsnips or even shredded Brussels sprouts for a different flavor profile that still delivers on texture. Sweet potatoes work beautifully in place of regular potatoes and add a touch of natural sweetness that plays nicely with the harissa heat. For a milder version, replace the harissa with smoked paprika mixed into the yogurt, or go entirely different with a herb-packed tzatziki instead.
- Add a tablespoon of cornmeal to the rösti mix for extra crunch and a subtle corn sweetness.
- Top with crumbled feta or goat cheese for a tangy, creamy contrast.
- Serve alongside a simple arugula salad dressed with lemon and olive oil to balance the richness.
 Save to Pinterest
 This dish has become my go-to when I want to impress without stress, the kind of recipe that feels special but never fussy. I hope it finds a spot in your rotation, too, and that you discover your own favorite way to tweak it, top it, and make it yours.
Recipe Questions
- → Can I prepare the rösti mixture in advance?
Yes, you can prepare the mixture up to 2 hours ahead. Keep it refrigerated and covered. Squeeze out any additional liquid that may accumulate before frying.
- → What can I substitute for celeriac?
Parsnips, turnips, or additional potatoes work well. Each brings a different flavor profile—parsnips add sweetness, while turnips offer a mild peppery note.
- → How do I prevent the rösti from falling apart?
The key is removing as much moisture as possible from the grated vegetables. Squeeze them thoroughly in a clean kitchen towel. The egg and flour act as binders, so ensure they're well mixed through.
- → Can I make this dairy-free?
Absolutely. Replace Greek yogurt with coconut yogurt or cashew-based yogurt. The harissa will still provide that tangy, spicy element.
- → How do I achieve extra crispy rösti?
Make sure your pan is hot before adding the mixture, don't overcrowd the pan, and resist the urge to flip too early. Let them develop a golden crust for 4-5 minutes before turning.
- → Can I bake these instead of frying?
Yes, brush with oil and bake at 200°C (400°F) for 20-25 minutes, flipping halfway through. They won't be quite as crispy as pan-fried but will be lighter.