 Save to Pinterest
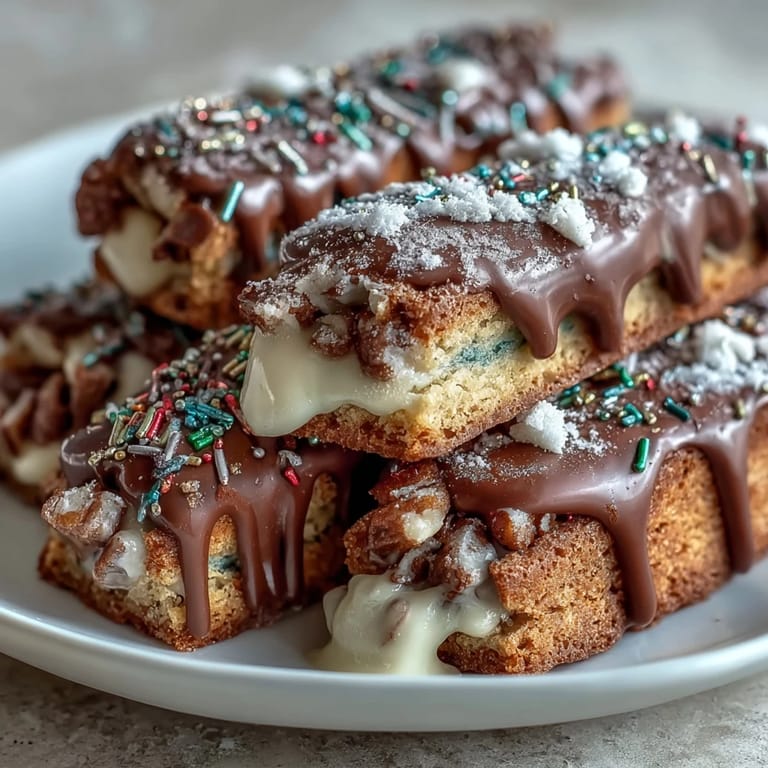
 My kitchen smelled like melted butter and pure joy the morning my neighbor knocked on the door with a box of rainbow sprinkles, declaring we had exactly three hours to make something festive for the neighborhood St. Patrick's Day gathering. I had no plan, no theme, just a pantry full of basics and someone else's enthusiasm pushing me forward. These bars came together so easily that afternoon, layers of buttery sweetness studded with white chocolate and those impossible-to-ignore sprinkles that made everything feel like a celebration. Within twenty minutes of pulling them from the oven, they were gone, and someone asked for the recipe before they'd even finished chewing.
I learned something watching my eight-year-old cousin decorate these bars with extra sprinkles before baking—sometimes the joy in a recipe isn't about perfect technique, it's about who's standing beside you in the kitchen. She carefully scattered each sprinkle like they were precious gems, and that simple act of care made these bars taste infinitely better when we finally ate them together.
Ingredients
- All-purpose flour (2 cups): This is your structure, your foundation, so don't sift it unless you actually want denser bars—just spoon it into your measuring cup and level it off with a knife.
- Baking powder (1/2 teaspoon): A whisper of lift that keeps these bars tender rather than dense, but if you go overboard with this, the texture gets weird and cakey.
- Salt (1/4 teaspoon): The secret ingredient nobody thinks about until they taste a batch made without it; this tiny amount makes the butter and sugar actually taste like something.
- Unsalted butter, melted and cooled (3/4 cup): Melted butter creates that tender, almost shortbread-like crumb, and cooling it slightly means your eggs won't scramble when you add them.
- Granulated sugar (1 cup): This gives structure and that subtle crispness at the edges that makes bars feel homemade rather than grocery store flat.
- Light brown sugar, packed (1/2 cup): The molasses here adds moisture and depth that granulated sugar alone can't deliver, so don't skip it or use dark brown as a replacement without expecting a different flavor profile.
- Large eggs (2): These bind everything while creating a tender crumb, and bringing them closer to room temperature helps them incorporate more smoothly into the butter and sugar mixture.
- Pure vanilla extract (2 teaspoons): The backbone of sweetness that ties every flavor together, so use real vanilla, not the imitation stuff that disappears into the background.
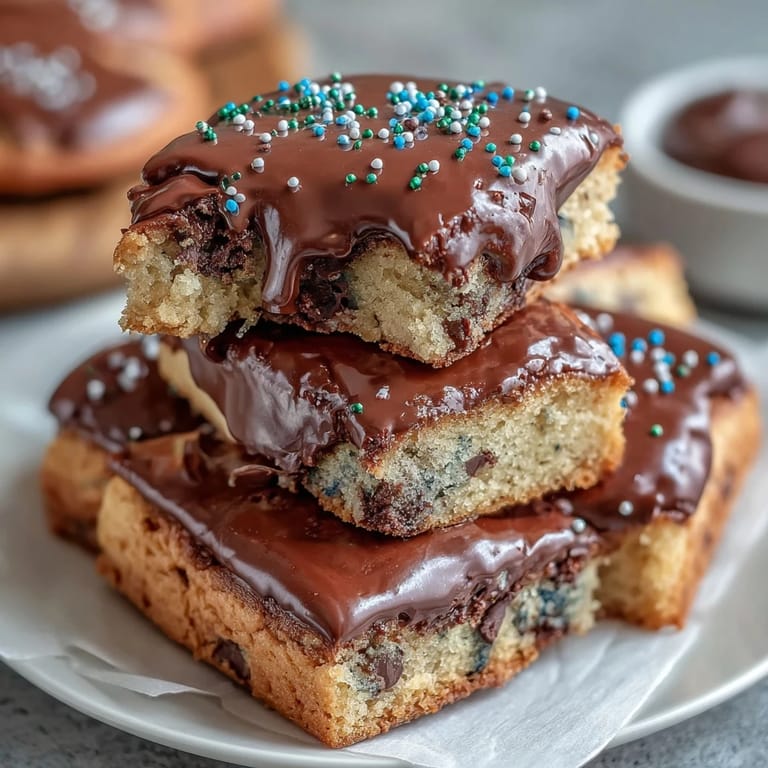
- White chocolate chips (3/4 cup): They soften slightly during baking and create pockets of sweetness that feel indulgent, though semisweet works beautifully too if you want something less sugary.
- Rainbow sprinkles, divided (1/2 cup): Split them intentionally—some fold into the batter for hidden pockets of color and texture, while others scatter on top for that unmistakable festive look.
Tired of Takeout? 🥡
Get 10 meals you can make faster than delivery arrives. Seriously.
One email. No spam. Unsubscribe anytime.
Instructions
- Heat your oven and prepare:
- Set the oven to 350°F and line your pan with parchment paper, making sure it overhangs the edges so you can lift the entire baked rectangle out easily once it cools. This step takes thirty seconds and saves you from the frustration of trying to cut bars out of a stubborn pan.
- Combine your dry ingredients:
- Whisk flour, baking powder, and salt together in a medium bowl and set it aside—this step distributes the leavening evenly so you don't end up with dense pockets. The whisking motion is important here, even though it feels redundant.
- Build your wet base:
- In a large bowl, whisk the melted butter with both sugars until you actually see them dissolve slightly and the mixture turns smooth and pale. This takes maybe two minutes and creates an emulsion that makes the final texture so much better.
- Bring the eggs and vanilla in:
- Add your eggs one at a time if you want to feel fancy, though honestly it's fine to crack them both in at once—whisk until everything looks fully combined and slightly thick. The mixture should look homogeneous, not separated.
- Marry wet and dry gently:
- Using a spatula, fold the dry ingredients into the wet mixture until you see no flour streaks, but stop before you start actually beating the mixture. Overmixing develops gluten and makes bars tough, so restraint here is a virtue.
- Fold in the good stuff:
- Stir in the white chocolate chips and about one-third of the sprinkles, keeping some back for the top so your bars look properly festive. The batter should feel thick and studded with color.
- Spread and top:
- Pour the batter into your prepared pan and use an offset spatula or the back of a spoon to spread it evenly into the corners. Scatter the remaining sprinkles across the top in whatever pattern feels right to you.
- Bake until just done:
- Pop the pan in the oven for 25 to 28 minutes—your bars are ready when the edges are golden and a toothpick inserted in the center comes out mostly clean with maybe a crumb or two attached. The center should have just a hint of softness so the final texture is perfect.
- Cool with patience:
- Let them cool completely in the pan on a wire rack before you even think about slicing, because warm bars fall apart and disappoint everyone. This patience step takes about an hour, but it's non-negotiable if you want bars that hold together.
 Save to Pinterest
 There's something about watching someone take a bite of a bar cookie that still has warmth radiating from the parchment paper underneath, their face lighting up because they didn't expect homemade goodness to taste this good and arrive this quickly. These bars became my go-to for potlucks, office celebrations, and the kind of moment when you need to show up with something that says you tried without demanding hours of your evening.
The Secret to Perfect Texture
The magic happens when you resist the urge to make these bars cake-like by overmixing or adding extra baking powder. The real texture comes from that melted butter base combined with brown sugar's moisture and just enough mixing to hold everything together. When you fold instead of beat, something shifts in the crumb structure—it becomes more tender, almost shortbread-like, and that's when people start asking if you used special butter or something fancy.
Why White Chocolate Matters Here
White chocolate isn't just sweetness—it's actually a completely different flavor experience that makes these bars feel special without overshadowing the buttery base. The cocoa butter in white chocolate creates a creamy mouthfeel that feels luxurious, and when those chips soften during baking, they distribute pockets of sweetness that milk or dark chocolate wouldn't quite achieve. If you're skeptical about white chocolate, this is the recipe that converts people because the flavor stays subtle and complements rather than competes with everything else.
Making This Recipe Your Own
The beauty of this base is how forgiving it actually is once you understand the foundation. You can substitute the white chocolate chips with whatever you have on hand, add a teaspoon of lemon zest for brightness, or even fold in a handful of crushed candy canes if you're making these around the holidays. The sprinkle situation is completely flexible too—use what you have, what matches your celebration, or what your kids insist on adding to make it feel like their creation.
- A drizzle of melted white chocolate on top after baking creates an elegant finish that makes these bars look bakery-worthy without any additional skill required.
- Green-tinted sugar crystals mixed into the top layer lean harder into the St. Patrick's Day vibe if you want maximum festivity.
- Store these in an airtight container at room temperature, and they'll stay soft and delicious for four days, though honestly they rarely last that long.
 Save to Pinterest
 These bars somehow turned into my most requested recipe, the thing people ask for when they know I'm bringing something to share. There's comfort in that—in knowing that something this simple, this fast, and this genuinely delicious has a permanent place in my kitchen rotation.
Recipe Questions
- → What baking pan size is recommended for these bars?
A 9x9-inch baking pan lined with parchment paper is ideal for even baking and easy removal.
- → Can I substitute the white chocolate chips?
Yes, semisweet or milk chocolate chips work well as alternatives to white chocolate chips.
- → How do I achieve the colorful topping effect?
Sprinkle green, gold, and rainbow sprinkles on top before and after baking for a festive layered look.
- → What is the best way to store the bars?
Store them in an airtight container at room temperature for up to 4 days to maintain freshness.
- → Are these bars suitable for vegetarians?
Yes, the bars contain no meat products and are vegetarian-friendly.